Showing posts with label bread of the week. Show all posts

Tuesday, May 8, 2012

Bread of the Week: Challah

I love making knotted and braided breads. This is the second time I made challah, first time post, from The Bread Baker's Apprentice. It's the bomb.


My sister was visiting last weekend. While she caught up on sleep, I prepared the dough for rising. Whisk eggs, oil, and water together.


 Add it to flour, sugar, salt, and yeast mixture. Mix with a paddle attachment until it combines then knead with the dough hook.


Once the dough has risen a couple times, combined time two and a half hours, we rolled them into three boules. Let them rest for ten minutes.


Then rolled them out. I missed the book's tip to leave the ends skinnier than the middle to make the most visually appealing challah, so we actually braided it twice.
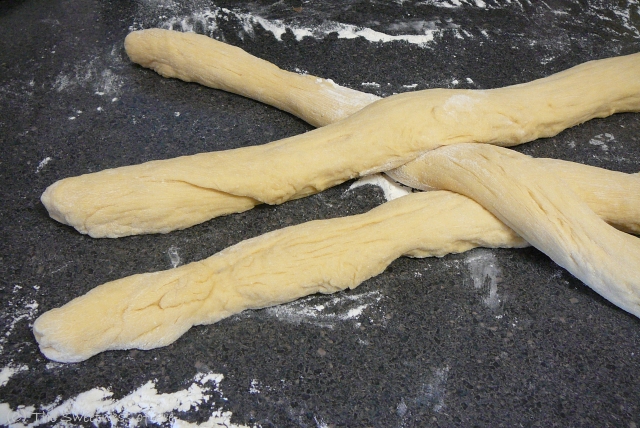

My sister and I each braided one side.


Brush with egg whites and let it rise on parchment paper for 45 minutes to an hour (our apartment tends to be cool). Bill, my sister, and I took that time to go to the hot yoga studio. Family yoga time.


Usually this recipe book lists a range of time it takes to bake the bread depending on your kitchen. Our oven seems to be leaning towards the hot side, so I would set the timer for the minimum amount of time needed. This time, however, the challah took much much less time than the recipe suggested. Only 25 minutes. I left it in the oven for three more minutes after it was golden brown to make sure the insides are baked through.


Not only is it good to snack on it plain, have it with butter accompanied by eggs and bacon, it's the best BEST bread for french toast.


So much for bread of the week. We have only two slices left after the weekend!

Monday, April 30, 2012

Bread of the Week: Ciabatta

I think I've found a new favorite bread recipe! This ciabatta recipe came from Bread.


The manual kneading method using a bread bowl is perfect for this recipe. I added some olives as suggested for more flavor. Just add the olives in to the yeast mixture before adding flour.


Bill says, more olives next time! But, adding the olives made it a little salty, so modify the salt amount as needed. Mix with a spoon for a while then switch to hands. Dip fingers in water if it gets too sticky. When it's well-mixed, about five minutes, cover with a towel and let rise in room temperature for half an hour.


Knead twenty times and let rise for an hour. After two rounds of kneading and rising...


Divide the dough into six pieces. Time to bring out the pizza cutter.


Brush pan with olive oil. Put bread pieces on the pan and brush them with olive oil. I thought I added too much, but it turned out perfectly. Let rise next to the stove or a warm spot for 45 minutes. Bake at 425 degrees for 18 minutes with a pan of hot water on the lower rack.


They are so tasty! By itself, the ciabatta is flavorful and filling. It's also great for sandwiches.


We made fish sandwiches.

I just wish we made more ciabatta. It's the beginning of the week and there's only one left!


Monday, April 23, 2012

Bread of the Week: Hawaiian Bread

Hawaiian bread, aka Portuguese sweet bread, was a new experience for us in Hawaii.


We were offered unlimited Hawaiian bread at one bed and breakfast. (I'm pretty sure Bill booked this place specifically for this feature.) There were three different types! From left to right: regular, guava, and taro. They were so colorful and delicious. Note the empty spaces...we ate more than our share. Guess, which one was my favorite flavor?

Authentic Hawaiian bread, obviously not made by an amateur
Of course, all this reminiscing make me crave some Hawaiian bread. Fortunately, my favorite bread book has a recipe! It uses dried milk powder, favoring that flavor over regular milk. Even though the book specifically mentions the dark mahogany color of the crust, we still think it's too dark. If you are baking one loaf at a time, decrease the baking time from 50 minutes to 30 minutes (or less). The resulting bread was delicious, especially right after it chilled, however, the texture is is not as I had remembered in Hawaii. I'm going to try using coconut milk next time. Perhaps I will have my own bread recipe to share in the future!

Make a paste-y starter
Let rise in a pie pan, then brush with egg wash
I swear it's suppose to be this brown!
Enjoy with a tropical drink, maybe some coconut milk?

Monday, April 9, 2012

Bread of the Week: English Muffins

It's been too long. We're back from sunny California. Aaand there's no bread in the house. But we happen to have just enough to make bread! Flour, yeast, butter, milk, and my trusty bread book.


This is the second time I attempted making English muffins. First make a soft dough and let it rise for three hours.


Heat a frying pan and cook the dough for eight minutes on one side.


Eight minutes on the other side.


Bake them in the oven at 350 degrees for eight more minutes.


"Fork-split" muffins after they're cooled. Darn...no nooks and crannies this time. The dough has to be even softer. Nonetheless the enriched dough is soo tasty. Maybe I'll make a loaf next time.


Tuesday, March 13, 2012

Bread of the Week: Viennese Rolls

Follow my blog with Bloglovin

This week, I made some rolls with two awesome birthday gifts I got last month. My thoughtful stepsister sent me a recipe book filled of delicious bread recipes. I picked the Viennese rolls to make first because they looked so deliciously mouthwatering. They are also very versatile--we had them for dinner twice in a row!


Coincidentally my mother-in-law sent me a vintage bread bowl and a butter paddle. It's perfect for this recipe, as you will see.


Viennese Rolls
Makes 6 to 8 rolls
Adapted from Bread

2 tsp active dry yeast
1 1/2 cup warm milk
2 large eggs
2 tbsp sugar
2 tsp salt
4 cups bread flour, separated
4 tbsp softened butter

Let the yeast dissolve in the milk for five minutes. Mix in the eggs, sugar, and salt. Add 3 1/2 cup bread flour and mix until combined and smooth, about five minutes. The dough will be very soft and sticky.


Cover with a towel and keep it in room temperature for 30 minutes. Next, knead in the bowl 20 times. The paddle comes in handy here as the dough stays very soft and sticky. Cover and let rise for one and a half hours. Then, knead 20 times. Work in the butter and sprinkle the rest of the flour to keep the dough for sticking. Cover and let rise for one hour.


Divide dough into six large rolls, or eight smaller rolls. This dough works kind of like drop biscuits. Line and sprinkle a baking pan with cornmeal. Drop the rolls on the pan. Cover and let rise for 20 minutes next to the stove. Preheat the oven to 425 degrees with a pan of water on the lower rack. Bake for 18 minutes without opening the oven door for the first 10 minutes.

The first night, we had them right out of the oven. Warm and wonderfully soft. Even better with butter.


Served with roasted chicken and green beans.


The second night, we had them as burger buns.

Grilled mushrooms, cheese, homemade patties. Now that's a burger!


Monday, February 27, 2012

Bread of the Week: Italian Bread

Another great recipe from The Bread Baker's Apprentice is the Italian Bread.


With the recipe, we made a loaf and four rolls. Now, we're set for the week!


Two techniques were used: pre-fermented starter called biga, and a make-shift hearth oven with a pan of steaming water and spraying the walls for the first two minutes. This produces a crunchy crust and soft center. The aroma was irresistible.


Bill says it's almost as if we bought it in Italy! We store the loaves in paper bags to keep the crust from softening.


Top down view.


Monday, February 13, 2012

Bread of the Week: Rye

Follow my blog with Bloglovin

My favorite sandwich has to be a reuben. I like all hot sandwiches, but ruebens are extra delicious because of the sauerkraut. A quick inventory of my fridge reveals sauerkraut, french dressing, cured beef, and cheddar (good enough). Time to make some rye bread.


Not a surprise to anybody I'm sure, I turned to my trusted Bread Baker's Apprentice, which has a recipe for two colored rye bread. This is my first time making rye. I was astounded at how much flour needed to make two loaves of bread. I double-checked, no, triple-checked the recipe. For the dark rye, I used cocoa instead of caramel coloring to give it that rich dark color. They came out crusty on the outside and soft on the inside.


The spiral bread was surprisingly simple, exactly the same way you'd make any other loaf of bread, just with layers.


The marbled rye was a little difficult to seal together. I think I will knead it a couple times after the dough is gathered together next time.


And then we made sandwiches! But I was enjoying a lazy Sunday so we didn't grill our sandwiches. Homemade bread is tasty either way, and there's plenty of bread left for a proper reuben soon (with Swiss)!