Showing posts with label dinner. Show all posts

Sunday, October 14, 2012

Chicken Soup with Herb Dumplings

I just had the best anniversary! My husband gave me a card, among other things, that ended with "With all my love, your husband." I have the best husband in the world, and I don't tell him that enough. It's hard to believe it's been four years since our wedding. We went to Vermont to take anniversary pictures to celebrate. Hopefully I can share them with you soon!

Actually, we are both recovering from a week long cold. During which, all I wanted to eat was soup. Thick chicken soup with dumplings. This is the best thing to eat when you're under the weather. It will warm you right up.


Chicken Soup with Dumplings
Makes 4 servings

2 chicken thighs
1/4 tsp salt
1/8 tsp ground black pepper
1/8 tsp dried oregano
1/8 tsp thyme
1 tbsp olive oil
2 carrots, sliced
2 celery stalks, sliced
1 tbsp Worcestershire sauce
3 cups water

Herb Dumplings
1 cup flour
1/4 tsp salt
1/8 tsp oregano
1/8 tsp basil
1 tsp baking powder
1/8 tsp ground black pepper
1 tbsp chopped parsley
4 tbsp cold butter, cubed
1 tbsp milk

Preheat oven to 350 degrees. Season chicken thighs with salt, pepper, oregano, and thyme. Roast for 20 to 25 minutes with the skin side up in a flame proof casserole. Take the chicken thighs out. Remove the skin and bones. Divide the chicken into bite size chunks and set aside. Add the olive oil and heat it on medium high heat. Cook carrots and celery until tender. Turn the heat down to medium. Add the skins and bones back in the pan with water and Worcestershire sauce. Bring a boil and let simmer for 20 minutes.

In the mean time, make the herb dumplings. Stir together the flour, salt, oregano, basil, baking powder, ground black pepper, and parsley in a medium bowl. Add butter and rub into the mixture with your finger tips. Stir in the milk to make a very thick batter. Bring the soup into a boil and drop the dumplings in with a spoon. Simmer for another 20 minutes.

Monday, May 14, 2012

Ready for Summer! Bruschetta

Summer solstice is a month away, but we are ready for summer now! The bees are buzzing about, and the pair of resident Canada geese has been circling the building in search for food. I'm hoping we will see some chicks in a couple of weeks.

This past weekend was hot and sunny. I took out my giant sun hat and visited a local garden center with Bill. We got a bunch of flowers to spruce up our balcony. In addition to flowers, we also got basil, "mojito" mint, and catnip--before it had a chance to take root my cat already bit off a piece! With our balcony filled with plants, our fingers are crossed for an aphid-free summer.

When it gets hot out, there's nothing like a refreshing drink with homemade appetizers. Bruschetta is always appetizing and a crowd-pleaser. It just brings out all the flavors of summer. You can use homemade or store-bought baguette. Stay tuned for a post on homemade baguette!


Ready for Summer Bruschetta
Makes 4 servings

3 cups various tomatoes (roma, cherry, grape), chopped
2 tbsp fresh basil, chopped
2 tsp balsamic vinegar, chopped
2 tbsp extra virgin olive oil
2 garlic cloves, chopped
Salt & pepper
1 baguette, 3/4 in to 1 in slices
1 garlic cloves, peeled
1/4 cup grated mozzarella
1/4 cup grated Parmesan

Preheat the oven for broiling. Combine tomatoes, basil, vinegar, olive oil, garlic in a medium bowl. Add salt and pepper for taste. Leave the mixture for 20 minutes for the flavors to set in.


Broil baguette for two minutes. Keep a close watch so they don't burn. Rub garlic clove on both sides of bread slices.


Top tomato mixture on bread. Sprinkle mozzarella and Parmesan over the tomatoes. Broil for a minute until cheese is melted. Bon appetit!


Wednesday, April 18, 2012

Arroz con Pollo

"What are we having tonight?" my husband asked. "Arroz con Pollo. Rice with Chicken." I replied.
"I see you remembered something from your Spanish classes after all."

Yes. Yes I did. Five years of Spanish, and I remember enough to translate what we're eating. That's better than nothing, I guess.

I think you're suppose to have more chicken in the dish, but we only had two drumsticks. Ours is truly Rice with Chicken. Lots of rice, not a lot of chicken. Just enough for two, and some rice leftover.

In our household, we usually eat Chinese fried rice. This Spanish fried rice was a much welcomed flavor change. It's an easy, delicious, and homey meal.


Arroz con Pollo
adapted from Simply Recipes

2-4 chicken drumsticks
1/4 cup all-purpose flour
1/4 tsp salt
1/4 tsp ground black pepper
1/8 tsp paprika
4 tbsp olive oil, separated
2 cups medium or long grained rice
1 onion, chopped
1 garlic clove, minced
2 tbsp red pepper, chopped
2 tbsp green pepper, chopped
3 cups chicken stock
1 cup tomatoes, diced
1/8 tsp oregano
1/2 tsp salt

Heat 2 tbsp olive oil in a medium frying pan over medium heat. Rinse and pat dry chicken drumsticks. Mix salt, black pepper and paprika with flour. Dredge chicken in flour. Fry chicken until all sides are browned.

In a skillet, heat 2 tbsp olive oil in medium high heat. Add rice, spread it out and let it brown for three minutes. Stir to let the other side brown.


Add onion, peppers, and garlic. Stir until onions have softened, about three minutes. Place the chicken on top of the rice.


Add chicken stock, tomatoes, oregano, and salt. Bring it to a boil and turn the heat down to low.

We don't have a lid for this pan. But no worries...I covered it with tin foil. Simmer for 25 minutes. Fluff the rice with a fork and it's time to eat!


Served with cilantro and lime wedges.


Thursday, April 12, 2012

Crockpot Country Style Pork Ribs

I'm getting lots of use out of my crockpot this week. Truth is, I've been too busy working on my crow pose to cook. But that doesn't mean we can't eat well!

Ribs. If I have to pick only one thing to eat for the rest of my life, I'd choose ribs (because you can't sustain off of ice cream). Surprisingly (to me), I don't make it that often. Well, there's no time better than now.

This recipe is adapted for allrecipes.com for slightly less ribs. But we made two meals out of it :)

Crockpot Country Style Pork Ribs
Makes 4 small servings

2/3 cup ketchup
2 tbsp distilled vinegar
1 tsp Worcestershire sauce
1 tsp Tabasco sauce
1 tsp Dijon mustard
1/2 tsp garlic powder
1/2 tsp onion powder
1/4 tsp paprika
2 tbsp brown sugar
1/8 tsp ground black pepper
1 1/2 lb country style pork ribs
1 onion slice into rings
1/2 cup of water*

Mix ketchup, vinegar, Worcestershire sauce, Tabasco sauce, Dijon mustard, garlic powder, onion powder, paprika, brown sugar, black pepper in a small bowl. Place ribs in crockpot. Pour sauce over the ribs. Place onion on top of the ribs. Add just enough water to cover ribs. Cook for 6 hours on high or 9 hours on low.

Served with steamed broccoli and white rice. Get ready for some fall-of-the-bone, melt-in-your-mouth deliciousness.


Wednesday, April 11, 2012

Crockpot Chicken Soup With Shiitake Mushrooms

It's still kind of chilly in the Northeast. It's after Easter, so I should getting some spring cleaning done, but it doesn't feel much like spring. Well, that's my excuse anyway. There are flowers blooming but I still need a coat when I go outside. On the bright side, it's perfect weather for some chicken soup in a crockpot. We made two dinners out of it. Once with rice, once with noodles. Mmmm noodles.


Crockpot Chicken Soup With Shiitake Mushrooms
Makes 4 small servings

3 chicken drumsticks
5 dried shiitake mushrooms
1 onion, quartered
2 carrots, chopped
1 celery stalk, chopped
1 potato, scrubbed & cubed
1/3 cup Marsala
1 3/4 cup water
1 1/2 tsp salt

Combine everything in the crockpot. Add one more drumstick and mushroom if you wish. Mine simply won't fit. Pour more water in to cover everything if needed. Cook on high for 6 hours or low for 9 hours. Enjoy with cooked rice or noodles!


We had Chinese style noodles from the Asian food market. It's almost as good as Japanese ramen. Speaking of which, I can't wait to go back to Boston and have some more. But in the mean time, chicken soup with noodles will do!


Wednesday, March 28, 2012

Chinese Dumplings with Beef and Green Onions

I have only a few childhood memories of helping my mom cook in the kitchen. Usually she handles it all. In one of them I remember chopping Napa cabbage furiously for the dumpling filling. Then we made snakes out of the left over dumpling wrappers, which I believe were homemade. This dumpling recipe doesn't have Napa cabbage in it, but it's made the same way--homestyle.


Chinese Dumplings
About 60 dumplings

1 lb ground beef
2 inch fresh ginger, minced
4 stalks green onions, finely chopped
4 large Shiitake mushrooms, softened and finely chopped
4 oz firm tofu, finely cubed
4 tbsp soy sauce
1/2 tbsp rice vinegar
1 tsp sesame oil
1/4 tsp finely ground pepper
1 tbsp corn starch
Dumpling wrappers

Dipping Sauce
6 tbsp soy sauce
1/2 tbsp rice vinegar
1 tsp sesame oil
1 stalk green onion, finely chopped
Hot sauce (Sriracha), optional

Prepare filling by putting ground beef, ginger, green onions, Shiitake mushrooms and tofu in a large bowl. Add soy sauce, vinegar, sesame oil and ground pepper. Mix a little, then sprinkle corn starch in the bowl. Combine until all ingredients are just incorporated. Do not over mix.


Set up a baking sheet with plastic wrap for placing dumplings and a bowl of water for sealing the wrapper.

My dumpling station
Place about one tablespoon of filling in the wrapper. If it's store-bought, one side will be less floured. That's the side to fill. Dip your finger in the water, then wet half of the dumpling wrapper along the side. Pinch in the middle, then seal both sides with your thumb and forefinger. Homestyle.


I made 45 dumplings this time. One serving is about 10 dumplings in my family. The uncooked dumplings can be frozen. Keep them on the pan while they freeze. Once they are frozen, keep in a freezer bag. It's so convenient when there are frozen dumplings in the freezer! The leftover filling is good for Chinese meatballs or Ants on Branches (future posts).

frontside
backside
Usually we fry half to make pot stickers, and cook half in boiling water. First the boiled kind: Add dumplings to about 3 quarts of boiling water. Stir carefully to prevent dumplings from sticking to the bottom of the pot. After they float up, wait two minutes, then use a slotted spoon to spoon them out. Carefully stir with a wooden spoon or chopsticks and a little bit of dumpling water so they don't stick together in the bowl.


To make the sauce, combine soy sauce, rice vinegar and sesame oil. Sprinkle in green onions. Add hot sauce if desired.


To fry dumplings: Heat 2 tablespoon of oil over medium high heat. Place dumplings bottom side down. Fry until golden brown, about 3 minutes.


Turn dumplings so the backside is down. Fry until golden brown.


Turn dumplings frontside down. Add about 1/2 inch of water carefully to avoid splashes. Cook until all the water is gone, and wait 2 minutes until the side that is down is also golden brown.

My stove is uneven so the dumplings are all gathered on one side

Fry to perfection and serve with sweet chili sauce.


It's our favorite meal. What's your favorite homemade meal?


Tuesday, March 13, 2012

Bread of the Week: Viennese Rolls

Follow my blog with Bloglovin

This week, I made some rolls with two awesome birthday gifts I got last month. My thoughtful stepsister sent me a recipe book filled of delicious bread recipes. I picked the Viennese rolls to make first because they looked so deliciously mouthwatering. They are also very versatile--we had them for dinner twice in a row!


Coincidentally my mother-in-law sent me a vintage bread bowl and a butter paddle. It's perfect for this recipe, as you will see.


Viennese Rolls
Makes 6 to 8 rolls
Adapted from Bread

2 tsp active dry yeast
1 1/2 cup warm milk
2 large eggs
2 tbsp sugar
2 tsp salt
4 cups bread flour, separated
4 tbsp softened butter

Let the yeast dissolve in the milk for five minutes. Mix in the eggs, sugar, and salt. Add 3 1/2 cup bread flour and mix until combined and smooth, about five minutes. The dough will be very soft and sticky.


Cover with a towel and keep it in room temperature for 30 minutes. Next, knead in the bowl 20 times. The paddle comes in handy here as the dough stays very soft and sticky. Cover and let rise for one and a half hours. Then, knead 20 times. Work in the butter and sprinkle the rest of the flour to keep the dough for sticking. Cover and let rise for one hour.


Divide dough into six large rolls, or eight smaller rolls. This dough works kind of like drop biscuits. Line and sprinkle a baking pan with cornmeal. Drop the rolls on the pan. Cover and let rise for 20 minutes next to the stove. Preheat the oven to 425 degrees with a pan of water on the lower rack. Bake for 18 minutes without opening the oven door for the first 10 minutes.

The first night, we had them right out of the oven. Warm and wonderfully soft. Even better with butter.


Served with roasted chicken and green beans.


The second night, we had them as burger buns.

Grilled mushrooms, cheese, homemade patties. Now that's a burger!


Thursday, March 1, 2012

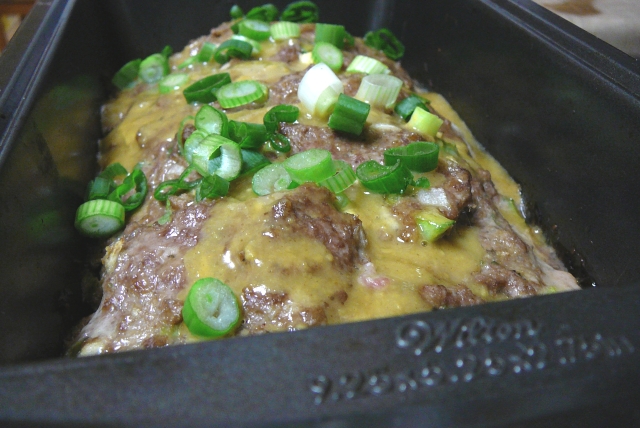
Honey Mustard Meatloaf

One of the first things I baked in my loaf pan was a loaf of meat. Before this and this, there was meatloaf.


This recipe, adapted from here, is tangy and sweet. Perfect for any day of the week.

Honey Mustard Meatloaf
2 eggs
1/4 cup chopped onion
1/4 cup chopped green pepper
1/4 tsp chopped dried leaf basil
1/2 tsp salt
1/4 tsp pepper
3 tbsp honey
3 tbsp Dijon mustard
1/3 cup dry bread crumbs, seasoned
1 1/2 lb ground beef
2 tbsp chopped green onion

Preheat oven to 350 degrees. Whisk two eggs in a large bowl. Mix in onion, pepper, basil, salt and pepper. Mix honey with mustard in a small bowl. Add half to the egg mixture, and reserve the rest. Add the bread crumbs, then the ground beef and mix until incorporated. Shape into a loaf. Bake for 30 minutes.


Add the rest of the honey mustard on top of the meatloaf. Sprinkle with green onions. Bake for an additional 30 minutes.

Served with a leafy salad.


Wednesday, February 29, 2012

Fresh Linguine with White Sauce

Here's another recipe for a romantic date at home, served with a slice of Italian Bread.


I love noodles. Since I got the pasta attachment for my KitchenAid, I can't get enough of fresh pasta. Bill usually doesn't like linguine, but he loved this meal. Homemade makes all the difference!


It actually takes less than an hour to cook this whole meal. Since the pasta is fresh, it takes less than five minutes to cook. As long as the chicken was prepared ahead of time, the sauce is pretty fast to cook as well. We had some leftover Chicken Under a Brick from a weekend dinner party and it was full of flavor, perfect for this meal.

Fresh Linguine
2 servings

2/3 cup flour
1/4 tsp salt
1 egg

White Sauce with Chicken
3 tbsp butter
1/2 onion, chopped
1 cup milk
1/2 tomato, chopped
2 cloves garlic, minced
1/4 tsp salt
1/8 tsp black pepper
1/4 tsp dried basil
2 tbsp flour
1/3 cup grated Romano cheese
1 cup cooked chicken, cubed
2 oz fresh spinach

Make the pasta dough with the flour, egg and salt. Carefully mix the egg with a fork on top of the flour. Gradually incorporate the flour and make a soft dough. Once most of the flour is incorporated, knead with your hand until it's smooth.


Divide the dough into three to roll out with a pasta roller. For this recipe, I stopped at level 6. Cut the pasta. Dust with flour to prevent it from sticking together. Before sauce is completed, cook the pasta in boiling water for 4 minutes.


To make the sauce, melt the butter in a sauce pan over medium heat. Cook the onion for 3 minutes. Add the milk, and stir in tomato, garlic, salt, black pepper and basil. Cook for 5 minutes. Whisk in the flour, one tablespoon at a time. Cook for 3 minutes or until thickened. Stir in Romano cheese, chicken, and spinach. Cook until spinach is wilted and the chicken is heated. Add the drained pasta to the pan and toss in the sauce. Serve with a slice of bread. Enjoy with a glass of wine!


Wednesday, February 22, 2012

Sour Cream Spinach With Toasted Pine Nuts

Easiest, healthiest, most delicious side dish ever.


Sour Cream Spinach With Toasted Pine Nuts
10 oz fresh spinach, rinsed but not dried
1/8 tsp salt
3 tbsp sour cream
Pine nuts, toasted

Heat a nonstick pan over medium high heat. Add spinach and sprinkle salt over it. Put a lid on for 3 to 4 minutes until spinach has wilted. Mix in sour cream. Top with pine nuts.

Tuesday, February 21, 2012

Caramelized Onion, Spinach and Feta Quiche

I've always loved caramelized onions. My mom used to make it with eggs and I could eat the whole platter all by myself, with rice on the side. This quiche is just delicious with caramelized onions. And spinach. And feta. There's layers and layers of flavor. It's good for breakfast, lunch, or dinner. Great for dinner parties (unless you planned on having leftovers). I got too caught up in the partying and forgot to take pictures of individual slices. Oh well, next time.


Caramelized Onion, Spinach and Feta Quiche

1 1/2 cups all-purpose flour
1/4 tsp salt
8 tbsp chilled butter, diced
4 tbsp iced water

1 tbsp olive oil
1/4 tsp salt
2 medium onions, sliced
1 cup frozen spinach, defrosted
4 oz Feta cheese, crumbled
2 eggs
1 egg yolk
1 cup heavy cream
1/3 cup grated Parmesan
1/4 tsp ground nutmeg
Salt & pepper

Prepare crust by cutting butter in the flour and salt mixture until it resembles coarse cornmeal. Add iced water until dough comes together. Refrigerate at least half an hour. Roll out the crust for the pan and refrigerate for another half hour. Preheat over to 400. Line the pie crust and add baking beans (or rice). Bake for fifteen minutes. Remove the foil and bake the crust for another ten minutes until golden brown.

Heat olive oil over medium heat. Add sliced onions. Sprinkle on salt. Stir occasionally over medium heat for fifteen minutes or until caramelized. Add a layer of spinach, a layer of onions, and a layer of feta in the tart.

Mix eggs and heavy cream in a mixer. Add Parmesan, nutmeg, salt & pepper. Pour custard into the tart.

Bake in the oven for 40 minutes at 400 degree.

Wednesday, February 8, 2012

Sweet Potato Ravioli

Got my pasta roller for Christmas...it's time to make some sweet (potato) ravioli! It's another one of Bill's favorites. I can't remember how many times we go to a new restaurant, and I would ask him, "You're getting the ravioli, aren't you?" And the answer is nearly always "Yep!" This dish has very few ingredients, yet it's so delicious! Another great dish for date night at home.


Sweet Potato Ravioli
Makes two servings

1 cup sweet potato, cubed
1/3 cup grated Romano cheese
1/2 tsp rubbed sage
Ground black pepper
2/3 cup all-purpose flour
1 egg
Salt
Olive oil and Romano cheese to serve

Cook sweet potato in salted boiling water for 15 minutes. Mash it and add Romano cheese, sage, and pepper.


Make pasta dough and roll out into sheets. I use a pastry cutter. It's less uniform than a ravioli cutter, but it works. Fill pasta with sweet potato filling and seal with a second square. Press the middle lightly.

Uneven ravioli adds character, no?

Cook for 7-9 minutes.


Serve with olive oil and more cheese!


Tuesday, February 7, 2012

Cheez-It Macaroni and Cheese

What food would you prepare for a zombie apocalypse? I'm pretty sure my husband would stash a closet full of Cheez-Its. After a week of Chinese buns and melon-y desserts, I decided it's time to make some of Bill's favorites. This recipe fills four ramekins. We each ate two :)


Cheez-It Macaroni and Cheese
Makes 4 servings

2 cups cooked macaroni
1 tbsp butter
1/2 onion, chopped
2 tbsp flat leaf parsley, chopped
1 tbsp flour
1 cup milk
1/8 tsp nutmeg
1/8 tsp paprika
Salt & pepper
1/4 cup grated Parmesan
1/2 cup shredded cheddar, divided
1/4 cup Cheezit crumbs

Cook macaroni for 9 minutes in salted water. Drain.


Melt butter in a skillet under medium heat. Add onion and parsley and cook for 3 minutes or until tender.


Stir in the flour. Mix in the milk, nutmeg, paprika, salt and pepper to taste, and cook for ten minutes. Stir in Parmesan, half of the cheddar and cooked macaroni. Pour in a baking dish or four ramekins.


Smash some Cheez-Its, stir in the remaining cheddar, and top it on the mac 'n' cheese. Bake at 350 degrees for 25 minutes.


Serve with hot sauce. Good for stay at home date nights!