Showing posts with label cake. Show all posts

Thursday, May 17, 2012

Mint Chocolate Birthday Cake

After tasting the scraps of a mint chocolate pound cake that I made and gave away, Bill can't stop talking about it. So when planning his birthday cake, I immediately started looking for a mint chocolate recipe that would go well with frosting. Of course, Martha Stewart has a recipe for everything.


This cake recipe is accompanied by a Swiss Meringue Buttercream recipe. This is not the first time I had attempted a frosting with heated meringue, but I had failed many times before. So this time, I studied up on it. This post changed my world. 


I wanted to add sea creatures around the cake, so I looked up how to make fondant. This marshmallow fondant didn't seem too hard. There's even a video that shows how to color fondant.


Here's a the adapted recipe from Martha, to make two 8 inch wide chocolate cake layers and one 6 inch wide mint cake layer:

Layered Mint Chocolate Birthday Cake
1/2 cup cocoa powder
1/2 cup hot tap water
3/4 cup sour cream, separated
3 cups all-purpose flour
1 tsp baking soda
1/2 tsp salt
1 1/2 cups (3 sticks), softened
2 1/4 cups sugar
4 large eggs
1 tbsp vanilla extract

Preheat oven to 350 degrees. Prepare baking pans by buttering the pans and line with parchment paper. Whisk cocoa powder and hot tap water in a small bowl. Mix in 1/2 cup sour cream.


Combine flour, baking soda, and salt in a medium bowl. Mix well.

In a stand-mixer cream butter with sugar with the paddle attachment on medium speed until light and fluffy. Mix in eggs one at a time. Beat in the vanilla. On low speed, add the flour mixture in three batches. Take out 1/3 of the batter and keep it a large bowl. Mix in the chocolate mixture on low speed with the rest of the batter until just combined. Divide into two 8-in cake pans.

Add the rest of the sour cream in the bowl containing the batter left on the side. Add 1 1/2 tsp peppermint extract. Mix on low speed, add green food coloring one drop at a time until the desired color is achieved. Pour batter into a 6-in cake pan.

Bake for 40 minutes in the middle layer, rotate pans every 20 minutes, or until a toothpick comes out clean. Cool completely before cutting into layers and icing.


After the cake is built and iced, when you cut into it, it looks like this.


Makes good large slices and small slices.


The frosting gave me quite a scare at first. I thought I was going to have to throw away another batch of Swiss Meringue Buttercream. It was liquid-y, even after I added all the butter, but I turned the mixer up with the paddle attachment and after five minutes, it all came together, just like Sweetapolita promised.


The marshmallow fondant was a lot of fun, and a lot easier to make and work with than I expected. You can make a few primary colors and knead the different colors together to create new colors, just like play-doh! They hold up well if you want to do any modeling and they taste just like marshmallows!


This cake can be kept at room temperature as long as you use parchment paper to cover the parts not covered by frosting, then cover the cake with a cake cover or plastic wrap. I'm so happy this cake came together, and I can't wait to make another birthday cake!


Tuesday, May 15, 2012

Let's Go Fishing Cake ~ Happy Birthday Bill!

Today is Bill's birthday! I decided to make a two-tiered cake. Since fishing is Bill's new obsession, I thought a fishing cake would be really fun. This cake from a google search was my inspiration.

This is the first time I've made a cake with multiple tiers, fondant cutouts, and Swiss meringue buttercream. I was beyond surprised and absolutely pleased everything came out without a hitch.

I've never made marshmallow fondant or a successful batch of Swiss meringue buttercream before. It was very nerve-wrecking when I started, but so thrilling when everything came together. I'll go over the recipes tomorrow because I just can't wait another day to share with you the fun part of building the cake!


First I started with chocolate cake layers.


Building it up one by one.


The top two layers are mint flavored, so I colored them green.


Cover the entire cake with plain frosting.


Then layer with colored frosting. Most of the cake represents the water, so there's a lot of blue. I think this could also be a good start for a Tiffany cake. Or a "It's a boy!" cake. Maybe some day. In the future :)


On the top tier, there is a patch of grass. For the fisherman to stand on, of course.


Seaweed lines the bottom of the sea.


Top-down view


And then it was time for some fun sea creatures. I wrecked my brain trying to come up with sea creatures that can be cut out with butter knifes. I came up with Goldfish, starfish, and seashells.


I started with a selection of marshmallow fondant I've colored with food coloring gel. They look like play-doh, don't they? My play-doh experience really helped me out here. The takeaway lesson is playtime is not just a waste of time. Remember that, future-me.


Roll them out and cut the sea creatures. Then I made this little man. It's constructed with a toothpick inserted down its core. All of my "research" on the food network came in handy. The takeaway lesson here is that TV is also not a waste of time. Go head, play with play-doh and while you watch TV, future kids!


The fishing pole is made with a toothpick and a piece of thread.


The little fisherman blew out the candles.


Happy birthday my dear husband! May all your fishing wishes come true!


Thursday, February 23, 2012

Raspberry Champagne Cream Cake

Cake! Is what's for dinner tonight.


Today's my birthday and my husband is making me orzo before we celebrate with cake.

I baked over the weekend; having a weekday birthday really cuts into cake baking time. Here's the recipe I used for the cake. It calls for a box of white cake mix. It seemed easier for me to use my own flour and baking soda than going to the store, so I looked for a recipe for white cake mix.


I used a sparkling wine with a raspberry note to it, and you can totally taste the wine. When I was done baking, the bottle was empty, even though the recipe only calls for 2 cups. Cheers!

And I loved the frosting! Marshmallows are much easier to work with than egg whites. But, I'd like the cake to be fluffier, so that's what I'll be aiming for next time.


For the raspberry sauce, I used about a bag of frozen raspberries and two tablespoons of sugar. It was yummy, and makes the presentation even prettier, don't you think?


Thursday, February 9, 2012

Coconut Pound Cake

Ok I messed up. I was trying make a cake where the inside has a different color and flavor from the outside. It was kind of a disaster. But the cake! The cake was delicious, and I couldn't resist sharing it. This recipe is adapted from flour.


Coconut Pound Cake
3 eggs
2 1/4 cup flour
1 1/4 cup sugar
1/2 tsp salt
2 tsp baking powder
3/4 cup butter, softened
1 cup coconut milk
1/2 tsp vanilla

chocolate cake butter cream (optional)
1/2 butter, softened
1 1/4 cup powdered sugar
2 tbsp cocoa powder
1 cup pound cake crumble

Beat eggs in stand mixer until smooth and lemon colored. Transfer to another bowl. Mix flour, sugar, salt, and baking powder in stand mixer. Add the butter and mix on low until the mixture resembles cornmeal.


Stir in eggs, coconut milk, and vanilla. Pour into a oiled and floured cake pan.


Bake at 350 degrees for 45 minutes. Cool in the refrigerator for at least two hours.


Cut the cake in half and scoop out the middle for 1 cup of cake, however you want. Add cocoa powder and crumble in the food processor. Cream butter with powered sugar, and mix in the cake. Add the butter cream back in the cake.

Do you want to see how disastrous my first attempt at cake carving was? It was not a pretty sight. I will make it prettier next time, I promise.

Presentation aside, this cake is amazing. I'm not a big fan of coconut (I know, how strange considering I love curry and piƱa coladas), but I almost ate the whole thing before I added the buttercream. So creamy and fragrant. Yum. Time for another slice.


Monday, January 9, 2012

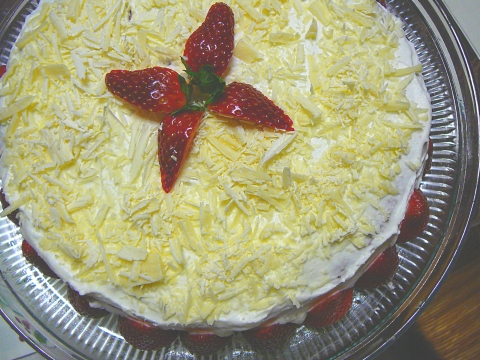
White Chocolate Strawberry Whipped Cream Cake

I finally get to share this cake! I've been saving it for a good day but I just can't wait any longer. So I'm just going to share it because it's a Monday. Happy Monday everybody!

It's one of my best cakes yet, and the first one since I started this blog. Last year for Christmas, I received this cookbook, All Cakes Considered, just in time for my stepfather's birthday on New Year's Eve. The first recipe I made there was the Red Velvet Cake. This year, I decided to make the whipped cream cake for his birthday gathering because I've always wanted to decorate a cake with white chocolate flakes. It was light, creamy and not too sweet. The best part was that everybody was at our apartment to enjoy it with us. 


There are some things to be improved on. Perhaps it was a little dry because the cream had been whipped too much. The second layer has some coffee, but it's not as good as the plain layer.


White Chocolate Strawberry Whipped Cream Cake
Adapted from All Cakes Considered

1 1/2 cup all-purpose flour
1/4 tsp salt
2 tsp baking powder
2 eggs
2 cup whipping cream, separated
1 cup sugar
1 tsp vanilla
1 cup powdered sugar
2 tbsp strawberry jam
4 oz white chocolate shavings
About 15 strawberries

Line and grease two 8-inch round cake pans. Mix flour, salt, and baking powder together. Set eggs out in a medium bowl until they're at room temperature. Whisk until light and lemon-colored. Whisk 1 cup of whipping cream in a large bowl when soft peaks form. Mix in the eggs and vanilla and whisk until light as foam. Mix in the sugar. Sift in flour mixture in three batches and fold in. Pour mixture into cake pans. Bake at 350 degrees for 25 minutes.


Remove cakes from pans and let cool. Whisk the remaining cup of cream until soft peaks form. Add powdered sugar and whisk until stiff peaks form. Spread the jam on the bottom layer. Then spread half of the cream evenly. Add the top layer and spread the remaining icing on the top and the sides. Decorate with strawberries on the side. 


Top with white chocolate shavings. I was using a cheese grater to shave my white chocolate. Then my talented sister arrived and showed me how to make chocolate curls using a vegetable peeler. Technique really is everything.


Refrigerate immediately! It can be served right away or after half--even a whole--day in the fridge. I think it tastes even better 24 hours later. Here's to many more birthdays for me to practice cake decorating!


Wednesday, December 21, 2011

Cranberry and Orange Swiss Roll

Finally, the dessert course! I was so anxious to make this dessert, and just ecstatic that it came out successfully. In Taiwan, Swiss rolls are a staple of bakeries, but I didn't know you can make it at home. Once I found this recipe, however, I realized how incredibly easy it is to make. (Thanks again Stephanie at Joy of Baking!) Plus, it looks so impressive when it's done!


The only thing I added was zest of an orange to the cake.


For the filling, I used 1/3 cups of canned cranberry sauce (half berry, half jelly), 1 cup of heavy cream, 1 teaspoon vanilla extract, and 2 tablespoons of granulated sugar. The cranberry orange flavor is a classic for the holidays. It can help put you in the mood if you're not feeling the holiday spirit!


The secret to making a successful Swiss roll or jelly roll, as I've learned, is to roll it up with a clean kitchen towel while it's still warm, and let it cool rolled up. That way when you roll it up with the filling, it won't crack. I love the neat textures my kitchen towel left on the cake.


For some reason we started talking about meat logs during dinner, and Bill ended up calling this cake a "sweet log." Enjoy this sweet log at room temperature or chilled. I personally like it straight from the fridge.


Give it a shot if you ever want to impress someone!